VIVA LA VEESTRO! Veestro Review

Post by Megan Stulberg

Let me just start this off by saying that this post is very important for you guys to read, because Veestro low key made my life *so* much easier for a week.

For those of you who aren’t familiar with Veestro, listen up. It’s a 100% plant-based, organic, non-GMO food delivery service with tons of gluten-free options. You can get individual items a la carte, meal plans for convenience, meal plans for weight loss, they even have juice cleanses. They deliver nationwide, too.

So earlier this year, the good people at Veestro sent me a care package of 5 or so items to try out, and their timing couldn’t have been better. I was slammed with work and barely had time to eat, and every time I needed to — whether it was at home or at the office — I just walked on over to the freezer.

Scroll down for details about what I liked the most.

casserole drawing

veestro 3veestro 2

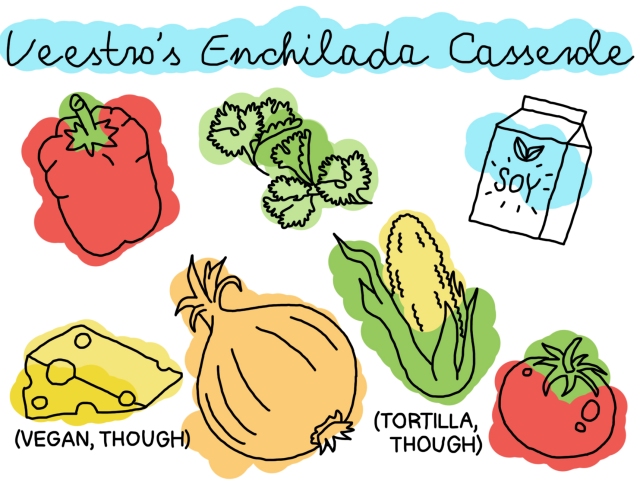
The enchilada casserole was unreal! I’m not one for fusion food usually (Tim Horton’s poutine donut, for example, is…unappealing to me, to put it lightly) but I do love enchiladas and I do love casseroles. This bad boy’s layered with tofu, corn tortilla, red sauce and tons of veggies. I ate it while working from home one afternoon while taking a break to read a little Jack Kerouac and recharge. 10/10 great combo, would highly recommend.

Tofu Curry drawing

veestro 5
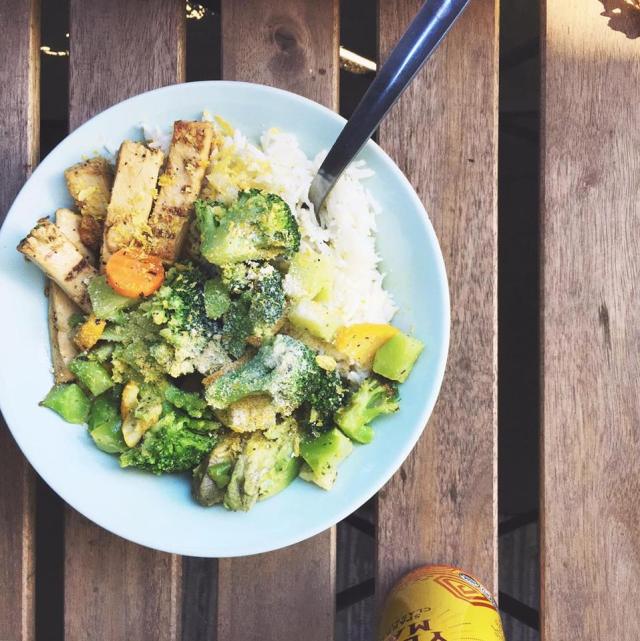
Veestro’s red curry with tofu was my favorite item that I tried from their menu, hands down. I ate for dinner one day at the office, which means I had meant to eat it for lunch but forgot…we all have those days. I am, without a doubt, tofu’s #1 fan — but it tastes like paper way more often than I’d like. It all depends on how it’s prepared, and I was happily relieved with how good the tofu in this dish tasted. It also means that I’m going to be ordering more tofu dishes from Veestro in the near future now that they’ve got my tofu trust and tofu attention, like their soba noodles with peanut sauce and/or their breakfast burrito. How many times can I get away with saying “tofu” in a paragraph? One more, probably. Tofu.
veestro 4

With this specific order I also tried Veestro’s golden chickpea stew, chocolate cheezecake and spanish torta. All were fantastic, and I’m so happy that vegan delivery services like this exist where the food is fresh and flavorful! If you’re a busy bee like I am (I’m writing this at a coffee shop right now and this iced latte is going to count as my lunch because I’m too forgone at this point), then check out Veestro’s meal delivery options. They deliver right to your door and life could not be easier.

*Disclaimer*: This is a sponsored post for Veestro, but all views are my own. For inquiries about sponsored posts, please email vegangirlfriend@gmail.com and/or megstulberg@gmail.com.  
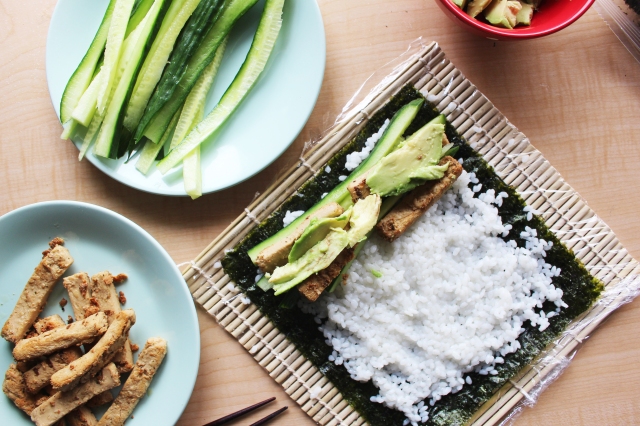
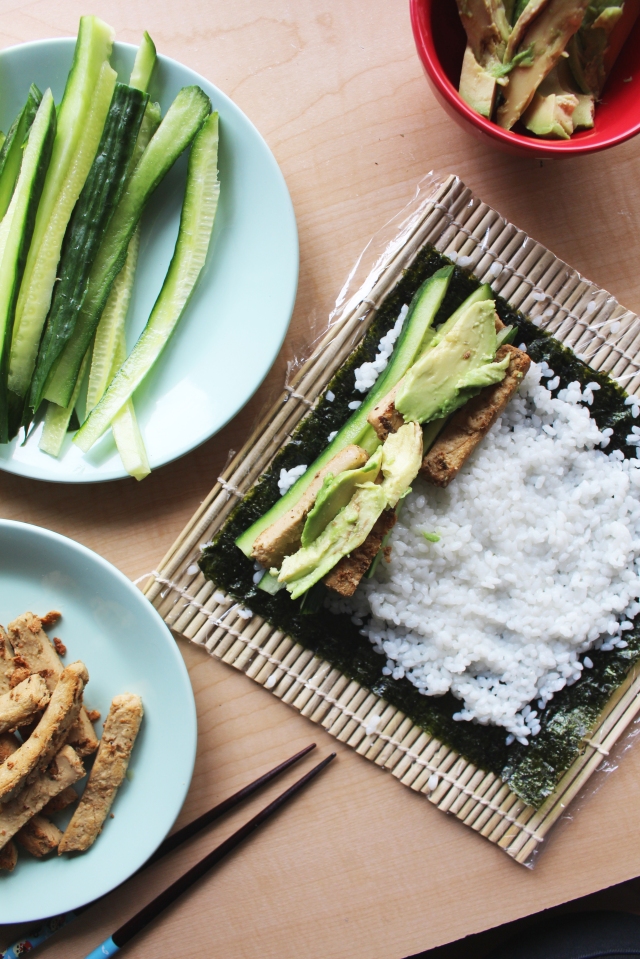
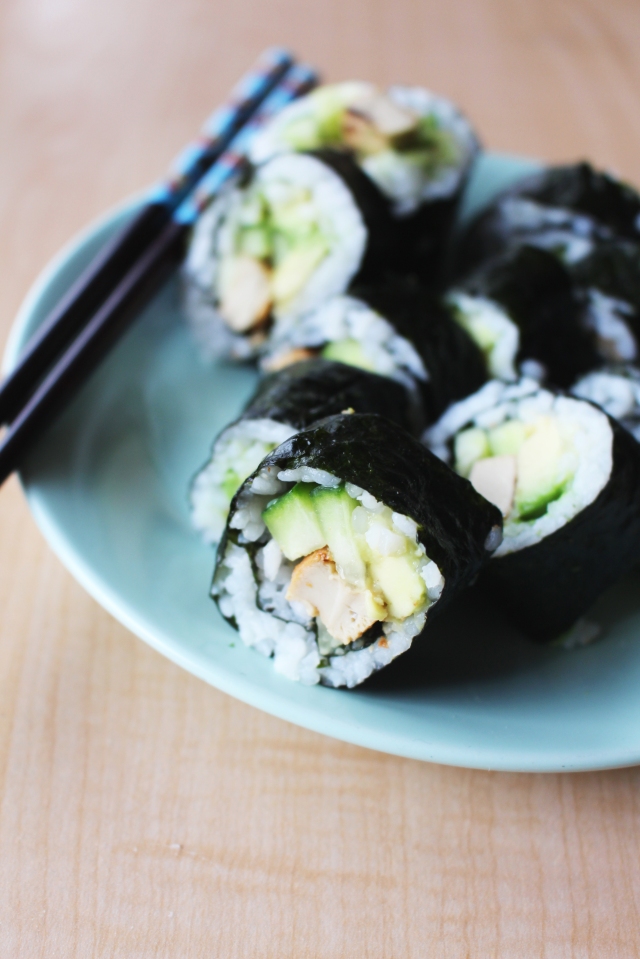
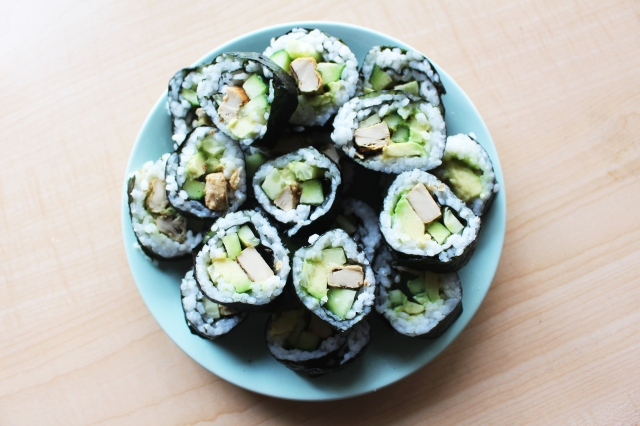
Cheeseburger casserole (V, GF)

Recipe & Photos by Megan Stulberg

I created this cheeseburger casserole low key by accident, shhh. I was invited to a vegan potluck hosted by a friend and when I was asked what to bring, they said “burgers or something”. Being the plant-based Celiac disaster that I am, there was NO way I was going to get like, 30 gluten-free buns. So I found an alternative with a similar taste that’d be easier to divide amongst guests.

casserole 1casserole 4Ingredients:

  • 2 standard-sized boxes/approx 2 cups uncooked gluten-free pasta of your choice (I used rotini)
  • 2 bags Beyond Meat beefy crumble
  • 1 bag Daiya Cheddar style shreds 
  • 2 tomatoes, coarsely diced
  • 2 cups raw kale
  • 1/4 cup dill pickles, finely diced
  • 1/4 cup dijon mustard
  • 2 tbsp EVOO
  • 1 tsp garlic powder
  • 1 tsp sea salt
  • 1 tsp black pepper

casserole 6casserole 2

Directions:

  1. Preheat oven to 375F and set a large pot of water to boil on stovetop.
  2. Cook pasta in boiling water until done al dente style (pasta should be a bit harder than usual, since it will be cooking more in the oven soon). Rinse with cold water and drain well.
  3. In large skillet, heat 1 tbsp EVOO over medium heat. Add the beefy crumble, then add the garlic, salt and pepper. Saute until cooked through and dark brown in color. Add kale and tomatoes, and cook for an additional 30 seconds. Stir in mustard, then remove from heat.
  4. Toss beefy crumble mixture with pasta in large bowl. Mix in handful of cheddar style shreds and diced pickles. I also added some extra mustard here for a more cheeseburgery flavor, but it’s up to you.
  5. Use 1 tbsp EVOO to coat bottom and sides of standard baking/casserole dish (roughly 9×13 inches) to prevent sticking. Spread pasta into prepared dish and top with the remaining cheddar style shreds.
  6. Cook in oven about 15 minutes or until cheddar shreds have melted.
  7. Sprinkle the rest of the diced pickles on top, and you’re ready to serve!

Serve hot. Makes approximately 6 meal sized servings or 12 side dish servings.

casserole 5


Aubergine Ricotta Rolls

Guest post by Amily Blanch 

Valentine’s Day seems like it was just yesterday. The streets were flooded with energized romantics, toy hearts and chocolates of all shapes and sizes. At this time of the year, especially, we are all craving to surprise our loved ones with a delicious dinner. Who says you can’t do a belated version in March? 

In the vegan community it is quite difficult to find recipes that would truly make even a non-vegan fall in love, so I wanted to share a few tricks I have up my sleeve, as well as tell you how to prepare a healthy, heavenly starter.

rolls-2

The dish itself is called Aubergine Ricotta Rolls and its overall making will take around 30 minutes and serve 4 people. This means, it’s perfect for a double date with your best friend and their significant other as well. 

INGREDIENTS…

What you will need for the vegan ricotta cheese: 

  • 7oz firm tofu
  • 1 1/2 cups of raw cashews, that previously had been soaked in water overnight
  • 1/4 cup of soy (or any other non-dairy) milk
  • Juice of one third of a lemon (around 2/3 tablespoons) 
  • Some salt and ground black pepper

What you will need for the rolls: 

  • 2 aubergines (also known as eggplants)
  • 1 tablespoon extra virgin olive oil

DIRECTIONS…

  1. Start by making the ricotta cheese. Firstly place the (drained) cashews into a food processor along with the tofu. It is important to soak the nuts in water overnight because that helps break down the phytic acid, water stops the acid from being absorbed into our bodies, and therefore reducing a feeling of heaviness after the meal. Soaking nuts also neutralizes their enzymes, allowing proper digestion to take place.
  2. Add half of the non-dairy milk that you have prepared, blend, and then the second half.
  3. After it turns into a smooth paste, add the rest of the ingredients: lemon juice, salt and pepper (for which the proportions may vary depending on how flavorful you want the “cheese” to be).
  4. Once that is done, you can start preparing the aubergines by cutting them lengthwise into very thin, wide pieces.
  5. While the pan is heating add 1-2 tablespoons of extra virgin olive oil. For extra flavour and a more intricate taste, chop up one small clove of garlic and let it sit in the olive oil for some time, this will infuse it with slight pungency. It is up to you whether you want to keep the small pieces of garlic in the oil or remove them before adding the oil to the pan. Remember to not add TOO much oil, or else the aubergines will not be cooked properly and that will affect the taste.
  6. After the oil is hot, place the aubergines on the pan and wait for the pieces to turn a beautiful shade of brown, and then flip.
  7. Afterwards, place the aubergines on a cutting board and start spreading a thin layer of ricotta on each of them. Roll them up, however if you find that they do not stay in a roll, you can use a toothpick to stabilize them. (Make sure to take them out before serving the dish though.
  8. Different ingredients can be sprinkled on top of the ricotta in the process like some chopped chives or a drizzle of lemon zest, if you want to put your own personal spin of this dish.

After the preparation and decoration of this beautiful starter, you can make the main dish. There are millions of recipes that involve servings like vegan ratatouille pasta or quinoa dishes that would blow your significant others’ minds. To finish off the lovely evening, share an appetizing raw cake made out of bananas, cocoa powder, walnuts, dates and agave syrup.

Anyone, no matter vegan or not, will be ecstatic after tasting this aubergine dish, so make sure you try it as well! The best thing about a complete, vegan Valentine’s dinner is that it contains all the vitamins and proteins that we need to be our best selves and feel good in our bodies, as well as, leaves us feeling energized, satisfied and not bloated at all.

Nuts provide protein and the vegetables are overflowing with vitamins like A, D and C, so instead of feeling guilty after having a chocolate cake for dessert, you will be focused on your date and celebrating love.

About Amily Blanch: A longtime vegan, red wine advocate, and health ambassador. Member of a team of freelance writers from New York publishing recipes for the Secrets of Vegan Baking blog and product reviews for the Consumerion site.

Interested in submitting a guest recipe post for our blog? Hit us up at vegangirlfriend@gmail.com, and we can chat.

RECIPES + TIPS TO BE VEGAN ON A BUDGET

Post by Megan Stulberg

One of the most common things I hear when I tell people I’m vegan is something along the lines of, “I want to go vegan too, but I can’t afford it”. I hate to call people out, but that just doesn’t make any sense! My diet isn’t a luxury, or the sign of a lavish lifestyle. Truth be told (and despite what our Instagram feed looks like) I eat very basic dishes 90% of the time. Meat and cheeses are expensive, tofu and veggies are not. Sure, if you’re buying organic cold-pressed juices and take-out vegan meals every day, then yeah. It’ll be expensive. But it’s not hard to do at all, as long as you do it right. Think of it like skipping a step — instead of feeding cows and pigs what they need to get big enough to be slaughtered and eaten, why not eat what the cows and pigs are eating instead? That way you save energy, water, money, and oh yeah. Lives.

Anyways, what I’m saying is stop making excuses. I went vegan when I was a broke ass university student, and you can too. Here are some staple recipe ideas to get you started that are balanced, cost-efficient and able to be prepared in bulk. 

Still have questions? You can always ask us! Here to help. Hit me up at vegangirlfriend@gmail.com.

SIMPLE PASTA BOLOGNESE:

budget3

Ingredients Needed:

  • Pasta (I use corn-based)
  • Jar marinara sauce
  • Beyond Meat “beef” crumbles
  • Go Veggie vegan parmesan “cheese”
  • Dried herbs and spices like basil, thyme, garlic powder, onion, black pepper

Steps:

  1. Make the pasta.
  2. Heat the sauce, sauté the “beef” crumbles. Combine.
  3. Coat pasta evenly, top with parmesan and serve.

Servings: 2-4

SIMPLE CURRY:

budget6

Ingredients Needed:

  • White rice
  • 1 can chickpeas
  • 1 can coconut milk
  • Frozen veggies (optional)
  • Curry powder, chill powder, garlic, onion, salt, black pepper — whatever spices you like pretty much, the only one you really need here is the curry powder.

Steps:

  1. Make the rice. I am not going to write step-by-step instructions out for you. You should know how to make rice. If you don’t, well…*gestures to door*. 
  2. Heat the coconut milk on stovetop. Add the spices.
  3. Heat the chickpeas, sauté the veggies in olive oil, dump everything together and serve.

Servings: 2-4

SIMPLE SUSHI: 

budget5

Ingredients Needed:

  • Sticky rice
  • Seaweed
  • Cucumber
  • Avocado (optional)
  • Gluten-free or regular soy sauce (optional)

Steps:

Follow our existing recipe here and just omit the meat substitute.

Servings: 2 servings, approximately 4 rolls.

SIMPLE MAC & CHEESE: 

budget2

Ingredients Needed:

  • Pasta (I used corn-based)
  • Daiya cheddar cheese shreds
  • Nutritional yeast
  • Almond, soy or coconut milk
  • Garlic, onion, thyme, salt, pepper

Steps:

  1. Cook pasta.
  2. Heat non-dairy milk on stovetop. Add Daiya shreds and wait for it to start melting, stir until completely combined into pourable sauce. Add nutritional yeast and spices, stir until mixed.
  3. Combine pasta and sauce. Serve with topping of your choice (ketchup, coconut bacon, veggies)

Servings: 2.

SIMPLE EVERYTHING-BUT-THE-KITCHEN-SINK BOWL: 

budget1

Ingredients:

  • A grain or starch (white rice, brown rice, potatoes, quinoa, pasta, whatever you have)
  • A protein (fake meat, lentils, beans, tofu, tempeh)
  • A vegetable (lettuce, peas, broccoli, carrots, cauliflower, kale)
  • A sauce/oil (marinara, pesto, olive oil, lemon juice)
  • A seasoning (nutritional yeast, garlic, onion, chill flakes, rosemary, basil, salt)

Steps:

Don’t worry about it! Cook whatever you have, in the way that you think is best. Sometimes it might seem a bit strange, but sometimes you’ll come up with something super amazing that’ll become a staple in your weekly meals. I mean, that’s how I figured out you can make personal pizzas by baking corn tortillas. Keep an open mind and embrace the experimental process.

SNACKS!

budget7

  • Ants On A Log. But modified, because nobody likes celery. Apple slices, peanut butter (I buy organic, sugar-free jars of this at Whole Foods for $2.50 — seriously, such a kitchen staple) and raisins.
  • Smoothies. Seriously! This isn’t a dumb thing to say is a snack! Healthy, filling and cheap. Buy those marked down, bruised bananas on sale in bulk. Chop them up, freeze them, and blend them with frozen spinach, almond milk, and a touch of maple syrup (optional). You can do this to make nana ice cream as well.
  • Popcorn. Buy the actual kernels and not the microwavable bags, it’s a much better deal this way. Add coconut oil and salt, maybe a little nutritional yeast, you can even do something crazy like melt chocolate on there.

OTHER TIPS!

  • Instead of buying fresh garlic, fresh onion, etc. — opt for the powdered versions. They won’t go bad and will basically last forever.
  • Buy frozen produce whenever possible, unless you’re really really really really good at eating everything in your fridge before it goes bad. Which I doubt. Sorry for the lack of trust, but I’m probably right.
  • Stock up on “cheap” proteins. Beans, lentils, tofu and peanut butter make the world go round.
  • Buy nutritional yeast in bulk. It’s super high in B12 and has a great cheesy taste to it. You’ll start putting it on everything, trust me.

Jalapeño Cornbread

Post by Aine Davis

There’s a flavour in Mexican cuisine that I’ve always loved, but have never been able to fully figure out. I feel like I’ve been searching for that flavour my whole life, and I was beginning to believe I never would find it. That is…until I decided to experiment with a new cornbread recipe. I had a leftover jalapeño in my fridge and at the very last minute, I decided to put it in the cornbread, and guess what? I done did it! I had found the flavour I had been searching for! Turns out it was jalapeño the whole time, who knew it was that simple?! I love it so much that I’ve made it every day for the last week (I’m not even exaggerating). I hope you enjoy it as much as I do!

1480644689274.jpg

INGREDIENTS:

  • 1 jalapeño, finely chopped
  • 1 flax egg (1 tbsp ground flax seed + 3 tbsp warm water)
  • 1 1/2 cups organic corn flour
  • 1 cup almond milk
  • 1/2 cup all purpose flour
  • 2 1/2 tbsp apple cider vinegar
  • 2 tbsp vegetable oil
  • 1 tbsp agave syrup
  • 1 tsp baking soda
  • 1 tsp baking powder
  • 1 tsp salt

DIRECTIONS:

  1. Set oven to 400°f.
  2. Whisk together almond milk and apple cider vinegar. Set aside.
  3. Whisk together ground flax seed and warm water to create flax egg. Set aside to let thicken.
  4. Combine remaining dry ingredients separately. Whisk together until they are completely incorporated without any lumps in the mix.
  5. Once the flax egg has thickened, whisk it in to the almond milk mixture as well as the vegetable oil and agave syrup. Whisk until oil is completely combined.
  6. Slowly mix the dry ingredients into the wet ingredients. Do not over mix.
  7. Fold in the jalapeños until evenly distributed.
  8. Pour cornbread mixture into a bread tin. Bake in oven for 30 minutes until golden on top.
  9. Set to cool, and enjoy!

Makes roughly six slices.

SERVING TIP:

I like to fry the cornbread in a little bit of oil to crisp up the edges and serve with my Pulled BBQ Tofu and Dijon Coleslaw! Combo of champions.

Baked Mac & Cheese Cups

Post by Megan Stulberg 

Another dish I whipped up for American Thanksgiving last week! These were a big crowdpleaser — and by that, I mean everybody ooh’d and ahh’d over them but I ended up eating most of the batch myself. Can you blame me, though? These cups are so good, both as a side dish or an appetizer. These baked mac and cheese cups are gluten-free and vegan, FYI.

And oh look, we made another video! Watch below and then subscribe for more on YouTube.

img_3359img_3360

Ingredients…

  • 1 box standard gluten-free macaroni
  • 1/2 bag cheddar style shreds (I used Daiya)
  • 1 cup almond milk, roughly
  • 1/2 cup nutritional yeast
  • 1/4 cup brown rice flour
  • 1 tbsp corn meal
  • 1 tbsp coconut oil
  • 1 tsp sea salt
  • 1 tsp thyme
  • 1 tsp red pepper flakes
  • 1 tsp garlic powder

Directions….

  1. Bring large pot of water to a boil.
  2. Dump that box of pasta on in. Cook accordingly, then drain.
  3. While pasta is cooking, make the sauce. Put almond milk in smaller pot and heat on medium. Add cheddar style shreds, stirring regularly until pieces melt. Add nutritional yeast, sea salt, thyme, red pepper and garlic powder. Once thoroughly combined and slightly bubbling, remove from heat.
  4. Drain pasta, then slowly add sauce to larger pot. You’ll probably have some leftover sauce, but add a bit extra as you’ll want extra moisture for baking.
  5. Add flour and cornmeal to pot, then mix to coat pasta evenly with sauce.
  6. Prevent oven to 350F.
  7. Coat muffin tray in coconut oil. Scoop mac and cheese by the spoonful into each cup.
  8. Sprinkle additional cornmeal for crunch, nutritional yeast and thyme on top.
  9. Bake in oven for 30 minutes or until slightly browned on top. Ensure that all liquid has evaporated when you remove them from the oven — this is crucial or else the cups won’t stay together.
  10. Remove from oven and let cool.

Serve warm, with dip or sauce of your choice. Makes 12 cups.

img_3363img_3364img_3371img_3372

Improved Pumpkin Pie (GF, V, No-Bake)

Post by Megan Stulberg

I have made many a’ pumpkin pies in my day. There’s this one I posted last year, for instance — which was good, but the consistency just wasn’t quite right and I knew I could do better. I made this dish the other day for American Thanksgiving and god *damn*, was it an improvement! The only problem was that it was all pretty last minute and the store was sold out of non-dairy whipped cream (my own fault), so I had it with vanilla bean ice cream instead. Still real good, though.

This pie is no-bake, raw except for the pumpkin puree, soy-free, gluten-free and vegan.

Watch the video below, click through to subscribe to us on YouTube, and read the following recipe! Enjoy.

img_3400img_3410

INGREDIENTS…

FOR THE CRUST:

  • 1 cup raw almonds, soaked overnight
  • 1 cup pitted dates, soaked overnight

FOR THE FILLING:

  • 3/4 standard can pure pumpkin puree
  • 1 cup cashews, soaked overnight
  • 1/4 cup coconut oil
  • 1/4 cup 100% maple syrup
  • 2 tbsp lemon juice
  • 1 tbsp organic vanilla extract
  • 1 tbsp nutmeg
  • 1 tbsp cinnamon
  • 1 tsp ginger

img_3413

DIRECTIONS…

  1. To make crust…Soak dates and almonds in separate bowls overnight.
  2. Drain. Pulse dates and almonds in food processor until crumb-like consistency has been reached.
  3. Line a small 5-inch round pan with plastic wrap or parchment paper. Press mixture into bottom of dish firmly to form an even crust. Leave in freezer to set at least 1 hour.
  4. To make filling…Blend all remaining ingredients until smooth. Spread onto crust and let set in freezer 1-2 hours, or overnight.
  5. Remove from freezer to thaw at room temperature for 1 hour, or in the fridge for 4-5 hours.
  6. Slice pie and serve with coconut whip or vanilla ice cream. Leftovers can be kept in fridge.

Makes 1 standard pie (6-8 slices).

img_3419img_3420img_3422

Blueberry Nice Cream and Chia Pudding Parfait

Post by Megan Stulberg

Breakfast! Break that frickin’ fast! But seriously, breakfast is important and people should make it a priority to eat it every day. If you don’t have a hearty appetite in the morning — try this blueberry nice cream and chia pudding parfait that I whipped up. It’s light and refreshing, but filling enough to keep you going until lunch. This recipe is vegan, gluten-free and raw.

img_3103img_3108

Ingredients…

  • 2 frozen bananas
  • 2 cups light coconut milk (approx. 1 can)
  • 1 cup fresh whole blueberries
  • 1/4 cup 100% maple syrup
  • 6 tbsp white chia seeds
  • 2 tbsp pure vanilla extract

    img_3110
    Directions…

    1. Chop bananas. Place in plastic bag, then leave in freezer overnight.
    2. Whisk together coconut milk, maple syrup and vanilla in large bowl or plastic storage container.
    3. Add chia seeds by the tbsp, stirring vigorously with spoon to prevent unwanted clumping.
    4. Cover bowl with cling wrap and leave in fridge overnight.
    5. Next morning, stir chia pudding then place back in fridge for 1-2 additional hours to help it further thicken.
    6. Next, make the nice cream. Remove frozen banana chunks from freezer. Using a food processor or blender, combine with 1/2 cup blueberries until smooth and creamy. Be careful not to over blend or else you’ll get a smoothie — which is also good, but not quite the goal here.
    7. When ready to serve, scoop chia pudding into mason jars or clear bowls by the spoonful. Layer with the blueberry nice cream, or top with remaining blueberries.

    Serve chilled. Makes 2 meal servings or 4 snack servings. Enjoy!

    img_3111

Crunchy “Chicken”, Avocado and Cucumber Sushi Roll (Recipe + Video)

Post by Megan Stulberg 

Back in high school, one of my favourite things to do with friends was get all-you-can-eat sushi. I always felt like I was going to barf after, but in the best way possible. I still love eating it — all sushi places will have at least a few vegan options, and making it at home is super easy once you get the hang of it. I’ve made sushi tons of times before but this roll is by FAR my favourite one yet. The fried “chicken” pieces make it taste like a crunchy roll, making me barely miss tempura. This recipe is obviously vegan and also gluten-free.

Also, this is my first time making a video 100% by myself! Filmed it, made the food, and even edited it. Go me. Watch the video (and subscribe plz n’ thx) on YouTube at:

Photos & recipe below:

img_3043img_3044

Ingredients:

  • 1 cup sticky sushi rice, organic if possible
  • 4 nori seaweed sheets
  • 1 255g bag Beyond Meat chicken strips  or alternative fake meat of your choice
  • 1 medium avocado, halved and sliced
  • 1/2 cucumber, cut into long thin strips
  • 2 tbsp extra-virgin olive oil
  • Gluten-free soy sauce, for dipping
  • Other supplies you’ll need: One standard bamboo rolling mat, large knife, water, plastic wrap, cutting board and chopsticks.


img_3080

Directions:

  1. Wash rice in cold water thoroughly until it runs clear. Bring hot water to a boil with the rice already in the pot. Cook covered for 20 minutes until water has been entirely absorbed and rice is sticky in consistency, stirring occasionally. If the rice is too hard, add water by the teaspoon and continue cooking. Fluff cooked rice with fork and set aside to let cool.
  2. In medium saucepan, heat EVOO until it sizzles. Add all “chicken” strips  and pan fry until crispy, adding additional olive oil while flipping. Set aside.
  3. Line your bamboo rolling mat with plastic wrap, then place on a larger cutting board or clean flat surface.
  4. Lay the rolling mat flat, and place a sheet of nori on top. Add a couple spoonfuls of rice onto the middle of the sheet. Wet fingers (or use a spoon if this grosses you out) and pat rice lightly down into a thin even layer. The rice doesn’t have to go right to the edges — basically, try to create a rectangular section of rice within the rectangular piece of seaweed 1/4 inch from the edge.
  5. Align the chicken strips, avocado and cucumber into a very thin horizontal line at the bottom of the rice on the seaweed sheet. Be careful not to overfill or else your roll will likely fall apart.
  6.  Tightly roll the seaweed sheet from the bottom, using the mat to press it together. Keep going, squeezing the roll to prevent it from falling apart. Dab a bit of water on the edge of the seaweed to seal it.
  7. Use a sharp knife to slice the rolled roll (lol) into bite-size pieces. Wet the knife between cuts to keep it clean. Having trouble doing this right? Use this easy guide here to help.
  8. Repeat steps 4-7 with the remaining sheets, rice and fillings.

Serve with gluten-free soy sauce and eat with chopsticks.

Makes approximately 4 rolls (2 servings).

img_3082img_3055


No-Bake Peanut Butter Cups

Post by Megan Stulberg

Peanut butter and chocolate has been my favourite taste combination for *literally* (read this in a Chris Traeger voice) as long as I can remember. Seriously! I always got my mum to buy them in bulk around Halloween so I could eat all the extra ones after trick-or-treaters came and went. Now that I’m a fully functioning adult member of society, however, I’ve come up with a healthier version out of necessity.

Get cho’ fix! These babies are gluten-free, vegan and no-bake. You can easily make them raw, too, by switching peanut butter to almond butter.

img_2814img_2817
INGREDIENTS:

  • 1 cup smooth peanut butter, melted or room temperature
  • 1/2 cup + 2 tbsp melted coconut oil
  • 1/2 cup raw cacao powder
  • 1/4 cup pure maple syrup or agave nectar
  • 1 tsp Himalayan salt

img_2833

DIRECTIONS:

  1. Line muffin tray with paper baking cups.
  2. Use a high-speed food processor or blender to combine 1/2 cup coconut oil, 1/4 cup pure maple syrup and 1/2 cup raw cacao powder together until a liquid consistency is reached. If you don’t have a food processor or a blender, use a microwave instead: stop to whisk together every 30 minutes to prevent burning, then keep melting.
  3. Spoon 1 heaping tbsp chocolate batter into bottom of muffin cups so they’re approximately 1/4 of the way full. You should have about half of the mixture left.
  4. Set muffin tray aside in freezer for time being.
  5. In medium mixing bowl, “whip” the peanut butter together with 2 tbsp coconut oil and a touch of salt until as smooth as possible. If you have to…you can pop this in the microwave as well. Shhhh.
  6. Once the chocolate layer is frozen solid (or at least firm), Place a dollop of peanut butter on top of each. It will spread out to the edges, flatten then put baking tray bake in freezer.
  7. Wait for peanut butter layer to set. This should take about 30 minutes.
  8. Pour all remaining liquid chocolate on top of the peanut butter layer to finish off the cups.
  9. Let set in freezer overnight to set.Makes approximately 6 servings. Serve directly from freezer – they should be chilled when serving as they melt easily and you can still bite into them when they’re cold.
    Enjoy!

img_2857img_2879img_2882img_2883img_2884img_2885