Crunchy “Chicken”, Avocado and Cucumber Sushi Roll (Recipe + Video)

Post by Megan Stulberg 

Back in high school, one of my favourite things to do with friends was get all-you-can-eat sushi. I always felt like I was going to barf after, but in the best way possible. I still love eating it — all sushi places will have at least a few vegan options, and making it at home is super easy once you get the hang of it. I’ve made sushi tons of times before but this roll is by FAR my favourite one yet. The fried “chicken” pieces make it taste like a crunchy roll, making me barely miss tempura. This recipe is obviously vegan and also gluten-free.

Also, this is my first time making a video 100% by myself! Filmed it, made the food, and even edited it. Go me. Watch the video (and subscribe plz n’ thx) on YouTube at:

Photos & recipe below:

img_3043img_3044

Ingredients:

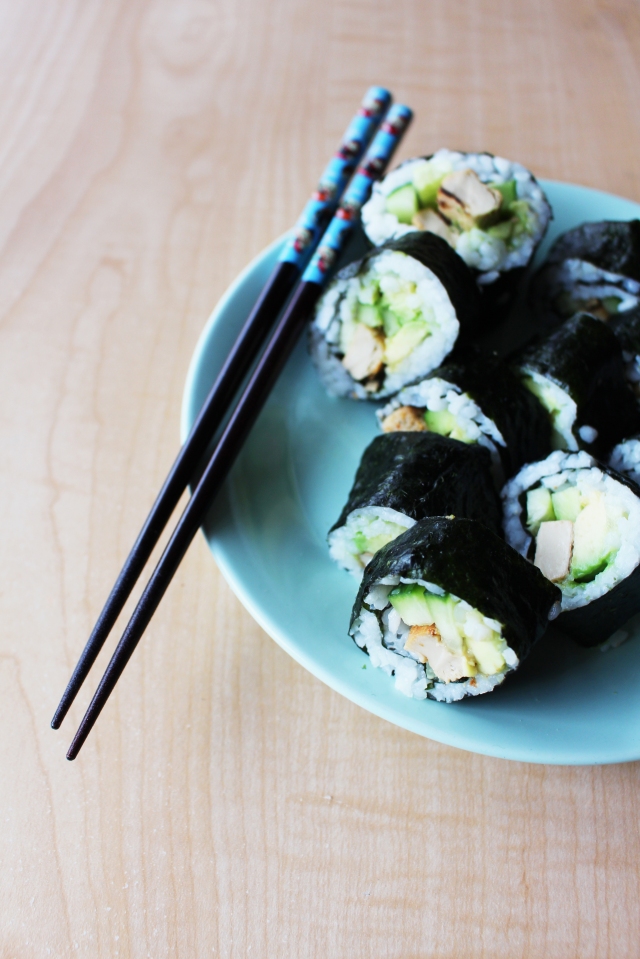
  • 1 cup sticky sushi rice, organic if possible
  • 4 nori seaweed sheets
  • 1 255g bag Beyond Meat chicken strips  or alternative fake meat of your choice
  • 1 medium avocado, halved and sliced
  • 1/2 cucumber, cut into long thin strips
  • 2 tbsp extra-virgin olive oil
  • Gluten-free soy sauce, for dipping
  • Other supplies you’ll need: One standard bamboo rolling mat, large knife, water, plastic wrap, cutting board and chopsticks.


img_3080

Directions:

  1. Wash rice in cold water thoroughly until it runs clear. Bring hot water to a boil with the rice already in the pot. Cook covered for 20 minutes until water has been entirely absorbed and rice is sticky in consistency, stirring occasionally. If the rice is too hard, add water by the teaspoon and continue cooking. Fluff cooked rice with fork and set aside to let cool.
  2. In medium saucepan, heat EVOO until it sizzles. Add all “chicken” strips  and pan fry until crispy, adding additional olive oil while flipping. Set aside.
  3. Line your bamboo rolling mat with plastic wrap, then place on a larger cutting board or clean flat surface.
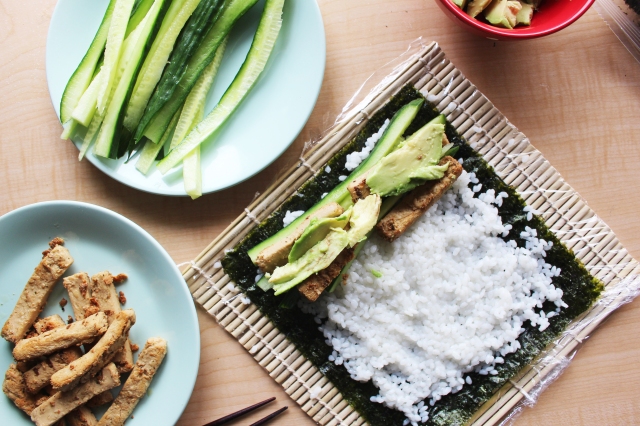
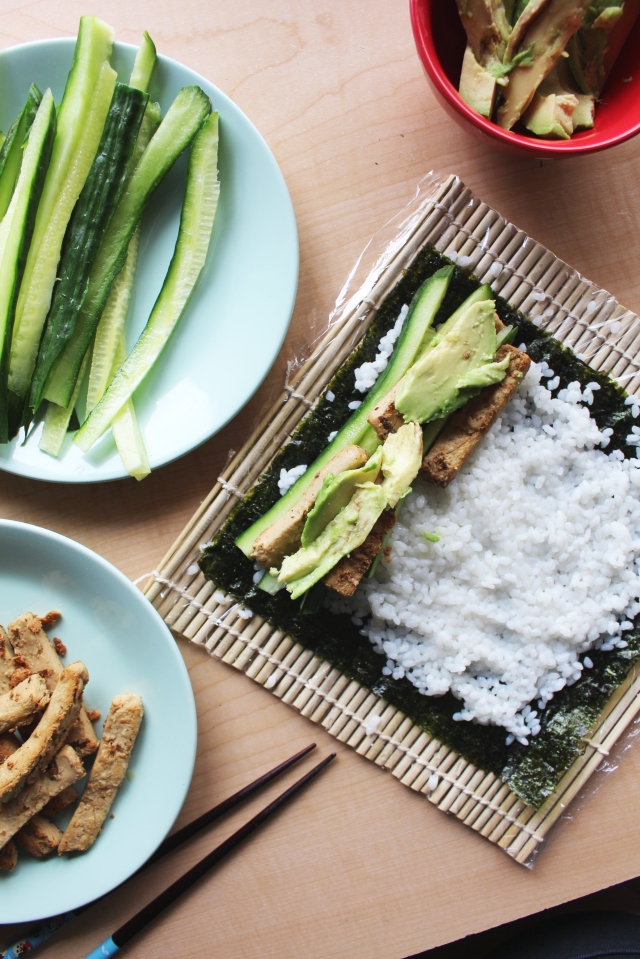
  4. Lay the rolling mat flat, and place a sheet of nori on top. Add a couple spoonfuls of rice onto the middle of the sheet. Wet fingers (or use a spoon if this grosses you out) and pat rice lightly down into a thin even layer. The rice doesn’t have to go right to the edges — basically, try to create a rectangular section of rice within the rectangular piece of seaweed 1/4 inch from the edge.
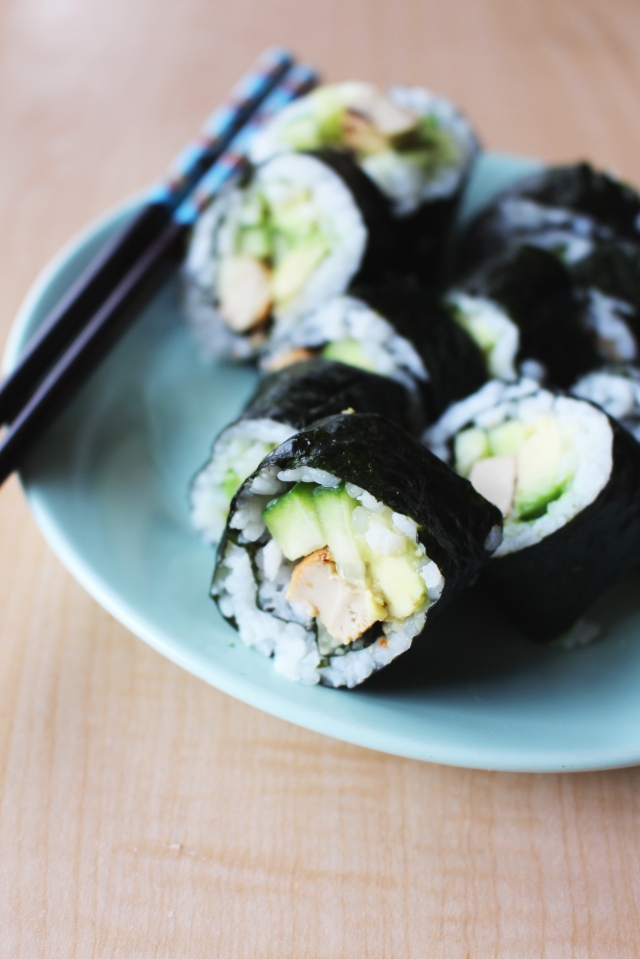
  5. Align the chicken strips, avocado and cucumber into a very thin horizontal line at the bottom of the rice on the seaweed sheet. Be careful not to overfill or else your roll will likely fall apart.
  6.  Tightly roll the seaweed sheet from the bottom, using the mat to press it together. Keep going, squeezing the roll to prevent it from falling apart. Dab a bit of water on the edge of the seaweed to seal it.
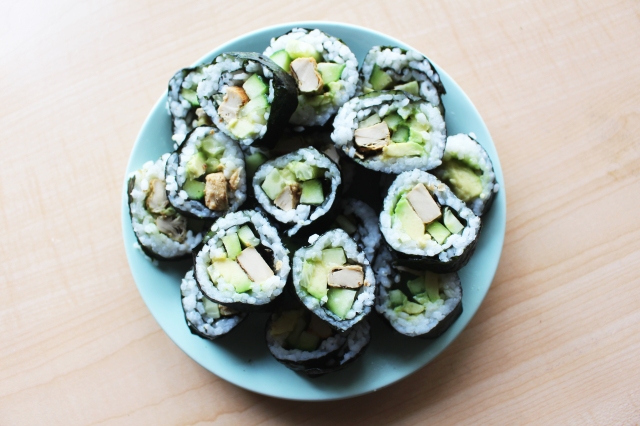
  7. Use a sharp knife to slice the rolled roll (lol) into bite-size pieces. Wet the knife between cuts to keep it clean. Having trouble doing this right? Use this easy guide here to help.
  8. Repeat steps 4-7 with the remaining sheets, rice and fillings.

Serve with gluten-free soy sauce and eat with chopsticks.

Makes approximately 4 rolls (2 servings).

img_3082img_3055


Raw Chocolate Avocado Mousse Tarts 

Post by Megan Stulberg, Alexandra Courts and Aine Davis

We’re back! With another video, you lucky dogs you.

Remember when we made that pad Thai? And those mimosas? Well we made raw chocolate avocado mousse tarts afterwards, and filmed that too. These are the perfect “something sweet” to enjoy after an afternoon of food and fun with your best gal (or guy, or non-binary) pals.

These tarts are raw, gluten-free, vegan, soy-free and artificial sugar-free. They’re SO easy to make too! All you need is some handy ingredients, a blender, a muffin tray and a freezer. Being fuelled by mimosas is also beneficial, but not a requirement.

Watch the video, then follow our recipe! Enjoy.

 
 INGREDIENTS:

For the Tart Bases…

  • 2 cups pitted dates
  • 1/4 cup raw almonds
  • 1/4 shredded unsweetened coconut
  • 1/4 cup raw cacao powder
  • Pinch of pink Himalayan salt

For the Mousse…

  • Flesh (lol gross) of 2 ripe avocados
  • 1/2 cup raw cacao powder
  • 1/4 cup 100% maple syrup or blue agave
  • 2 tbsp coconut oil
  • 1 tsp pure vanilla extract
  • Pinch of pink Himalayan salt

DIRECTIONS:

  1. Line a muffin/cupcake tray with plastic wrap or strips of wax paper, as shown in the video.
  2. Blend the dates, raw almonds, shredded coconut, raw cacao powder, and pink Himalayan salt until mixture is fine in texture and thoroughly combined.
  3. Press the tart mixture into the base of each muffin base. 1/4 inch of the way full is ideal. Set aside tray with tart bases in freezer for time being.
  4. Blend all ingredients for the mousse together until smooth and creamy in consistency.
  5. Spoon the filling overtop of each tart base until each muffin cup is full. Pat down mousse with back of spoon for a flat look.
  6. Allow the tarts to freeze for 1-2 hours before serving.
  7. Garnish with your toppings of your choice. We chose frozen raspberries and raw pecans.

Serve chilled. Makes approximately 8-10 servings.

Raw Key Lime Avocado Tarts 

Post by Megan Stulberg 

(Posted in advance on our Instagram here)

If you guys are sick of our raw dessert posts…then too bad! These key lime avocado cream tarts taste the way summer should feel: light and guiltless.

11119668_10155607893810133_261234091_n 11311911_10155607893790133_1794692082_n 11289648_10155607893855133_1594810197_n 11328800_10155607893860133_522750037_n

INGREDIENTS:

For the crust…

  • 2 cups raw almonds
  • 1 cup unsweetened shredded coconut
  • 1/4 cup coconut oil
  • 2 tbsp 100% maple syrup

For the filling…

  • 10 key limes, juiced
  • 2 avocados, pitted and scooped
  • 1/4 cup coconut oil
  • 2 tbsp 100% maple syrup
  • 1 tbsp pure vanilla extract

DIRECTIONS:

1) In a high-speed food processor/blender combine almonds, coconut, oil and syrup until finely incorporated.

2) Line a standard cupcake pan with plastic wrap. Press the crust mixture into each cup firmly and evenly. Set aside.

3) Blend juice from key limes, avocado meat, oil, syrup and extract together into a smooth but workable cream.

4) Pour filling on top of each crust. Top with additional key lime slices for garnish if desired.

5) Place tray in freezer for 2 hours to set. Remove tarts from pan and let thaw at room temperature for 1 hour before serving.

Freeze leftovers immediately or avocado in cream will turn brown.

Makes approximately 9 servings.

Fried Tofu, Eggplant and Zucchini Sushi Maki

By contributor Megan Stulberg

Two of my favourite things are vegetables and rice, so naturally I love sushi. There are only so many gluten-free/vegan take-out options though (I’m getting sick of cucumber rolls), so I decided to make something more interesting instead.

10255371_10155263898280133_1087237802_n 11051089_10155263898250133_1399711052_n

Ingredients:

  • 2 cups sushi rice (organic)
  • 4 pieces seaweed
  • 1 standard package firmly-pressed tofu (organic)
  • 1 medium avocado, halved and sliced
  • 1/2 eggplant
  • 1/2 zucchini
  • 1/2 lime, juiced
  • 1/4 cup gluten-free soy sauce
  • 2 tbsp extra-virgin olive oil
  • 2 tbsp nutritional yeast flakes
  • 1 tbsp garlic powder
  • 1 tbsp onion powder
  • Dash of red-pepper chili flakes
  • Dash of Himalayan pink salt
  • Dash of black pepper

Other supplies you’ll need: One standard bamboo rolling mat + chopsticks.

Directions:

  1. Wash rice in cold water thoroughly. Bring hot water to a boil with the rice already in the pot. Cook covered for 20 minutes until water has been entirely absorbed and rice is sticky in consistency. If the rice is too hard, add water by the teaspoon and continue cooking. Be careful not to add too much water! I did the first time and it got so mushy that I had to start over. Fluff cooked rice with fork and set aside.
  2. Slice tofu into thin strips. Marinate in soy sauce and nutritional yeast for 10 minutes. In medium saucepan, heat a dash of EVOO until it sizzles. Sprinkle tofu with garlic and onion while cooking, and fry tofu until texture is very firm. Set aside.
  3. Cut zucchini and eggplant vertically into very thin, long strips. Pan-fry on medium heat in EVOO and add red pepper flakes, lime juice, salt and pepper. Cook until vegetables have browned, then set aside.
  4. Line your bamboo rolling mat with plastic wrap to avoid making a big mess and place a glass of water next to your work station. Important: Wait for your vegetables and rice to cool, otherwise the rest of this process will be harder than it needs to be!
  5. Lay the rolling mat flat and place a couple spoonfuls of rice onto the middle of the sheet. Wet fingers and pat rice lightly down into a thin even layer. The rice doesn’t have to go right to the edges — basically, try to create a rectangular section of rice within the rectangular piece of seaweed 1/4 inch from the edge.
  6. Align the tofu strips, eggplant, zucchini and avocado into a very thin horizontal line at the bottom of the rice. Be careful not to overfill. I combined all of my ingredients at once but you can do designated avocado rolls, eggplant rolls, and so on if you’d prefer.
  7.  Tightly roll the seaweed sheet from the bottom, using the mat to press it together. Keep going, squeezing the roll to prevent it from falling apart. Dab a bit of water on the edge of the seaweed to seal it.
  8. Use a sharp knife to slice the roll into bite-size pieces. Wet the knife between cuts to keep it clean. Important: Having trouble doing this right? Use this easy guide here to help.
  9. Keep rolling! Make as much as you’d like and get creative with your fillings.

Serve with gluten-free soy sauce and eat with chopsticks.

Makes approximately 4 rolls (2 servings).

Onigiri: Vegan & Gluten-Free

Post by Aine Davis

Like most people who grew up in the ’90s, I watched a lot of anime as a kid. What I remember most vividly was the food the characters ate.  I salivated while watching my favourite characters bite into delicious dumplings, sushi, maki rolls and cakes.

But as a young vegetarian, I knew I’d never be able to bite into a delicious Japanese savoury pork bun.  So I did what any mature seven-year-old would do: I moved on.

Recently, I rediscovered my love for anime…oops! But this time, I had more tools at my hands, and I came up with a recipe for one of the most delicious Japanese foods: onigiri! “Onigiri” is the Japanese term for triangular rice balls traditionally wrapped in seaweed.

DSC_0049

What I love and admire about Japanese food is that most dishes are fresh and healthy. Minimal ingredients are used without using many spices or herbs, which allows each ingredient to shine.

onigiri-ingredients

onigiri-ingredients2

VEGAN ONIGIRI

Ingredients:

  • 1 cup short grain rice
  • 1/4 cup rice vinegar
  • 2-3 cloves of garlic
  • Pinch of cilantro, to taste
  • 2 scallion leaves, finely chopped
  • 1/2 standard avocado, cubed*
  • 1/2 standard cucumber, cubed
  • 1 tsp lemon juice
  • 1/4 cup roasted sesame seeds
  • Pinch of red pepper flakes, to taste
  • 1 tbsp gluten-free soy sauce, optional

Directions for Preparation:

  1. Steam rice. I used this helpful guide for the perfect sushi rice. Do not stir rice until fully cooked.
  2. Once rice has steamed, pour in rice wine vinegar. Move rice to a larger bowl and set aside. Let cool.
  3. Dice garlic, cilantro and scallions, and cut cucumber and avocado into small chunks. Immediately dress avocado with lemon juice so it does not spoil. *See photographed guide below photo guide below on how to properly cut an avocado.
  4. Toast sesame seeds. Place on a baking tray and put in oven at low heat. Let toast about 10 minutes or until seeds become fragrant.
  5. Once rice has cooled, begin to assemble the onigiri!

Use the photos below as a guide.

Directions for how to extract avocado:

DSC_0031

Cut avocado around the seed, split halves and extract seed with knife. Throw seed away. Slice squares into the avocado halves, but be sure not to break through the skin.

DSC_0032

Using a large spoon, slide spoon between the avocado meat and the skin. Scoop!

DSC_0034

Pop the avocado out of the skin. Boom!

Directions for Onigiri Assembly: 

  1. If the rice mixture is not sticky to touch, add a splash more rice vinegar.
  2. Spread out a large piece of plastic wrap evenly on cutting board.
  3. Add a large spoonful to the middle of the plastic wrap.
  4. Layer avocado, scallions, garlic, cilantro and red pepper flakes. Add another spoonful of rice on top of vegetables.

DSC_0037  DSC_0039

5.  Fold the four sides of saran wrap upwards, like this:

DSC_0043

6. Pinch the top in one hand…

DSC_0044

7. Spin the rice ball until the cling wrap is tight and the rice is closely packed.

DSC_0045

8. Shape the ball into a triangle. Unwrap from cling wrap carefully and roll in sesame seeds.

DSC_0042

Ta da! Serve with gluten-free soy sauce if desired. Makes 4 servings.