Lemon Cheesecakes with Raspberry Compote (Raw, Vegan, Gluten-Free, No-Bake, Refined Sugar-free)

By contributor Alexandra Courts

I made these treats with a pal but didn’t photograph them until after we’d already gobbled up all the sauce. Oops! We’re on a raw dessert recipe rampage lately, so just go with it.Processed with VSCOcam with f2 preset Processed with VSCOcam with f2 preset

INGREDIENTS:

For the crust…

  • 2 cups dates
  • 1 cup raw almonds, soaked
  • 1/2 cup shredded unsweetened coconut

For the filling…

  • 4 lemons, juiced
  • 2 cups soaked cashews
  • 1 cup frozen raspberries
  • 1/2 cup full-fat coconut milk
  • 1/4 cup organic maple syrup \For the compote…
  • 1/4 cup water
  • 2 tbsp organic maple syrup

    DIRECTIONS:

    1) Blend almonds and coconut together until finely processed. Add dates and continue blending.

    2) Line a standard muffin pan with plastic wrap and press the mixture into each cup firmly and evenly to form individual crusts. Set aside.

    3) Blend all filling ingredients until smooth. If desired, add more lemon juice to taste.

    4) Pour filling on top of each crust, then place tray in freezer immediately for 1 hour to set.

    5) Blend raspberries, water and syrup together into a liquid. Set aside in fridge until serving.

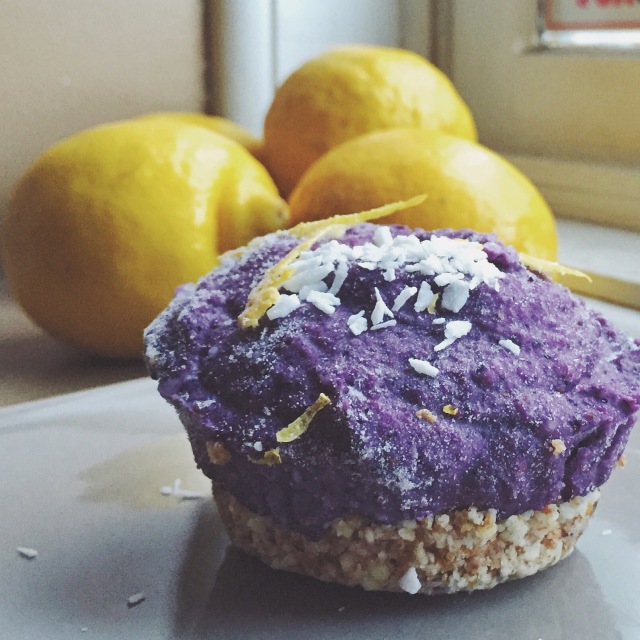
    6) Thaw cheesecakes at room temperature for 30 minutes. Top each with a dollop of raspberry compote (or simply frozen raspberries, as pictured above).

    Makes 12 cupcake-sized desserts.

    WANT TO MODIFY IT?

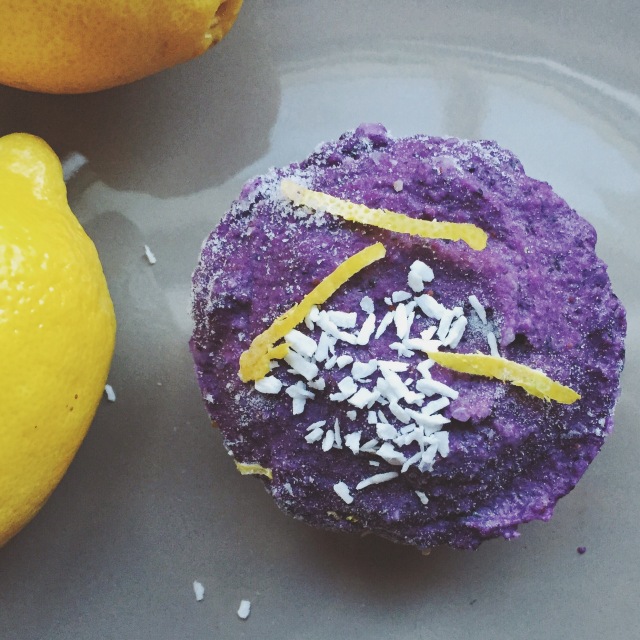
    Feel free to change up the recipe a bit! We remade them and added 1-2 cups of frozen blueberries to the mix, seen below:2015/01/img_2353.jpg 2015/01/img_2349.jpg

Peanut Butter and Jam Mousse Tarts (Gluten-free, vegan, no-bake, raw option)

By contributor Alexandra Courts 

I’m not a huge fan of gluten-free bread, but sometimes I do miss being able to snack on peanut butter and jam sandwiches! These mousse tarts incorporate nothing but healthy and natural ingredients, making them equally appropriate for both dessert and breakfast.

IMG_6648Processed with VSCOcam with f2 preset

Ingredients:

Crust…

  • 2 cups pitted dates
  • 1 cup raw almonds
  • 1/2 cup shredded coconut

Filling…

  • 2 cups cashews, soaked overnight
  • 1 cup natural peanut butter (alternatively can use raw almond or raw cashew butter, if preferred)
  • 1 cup canned full-fat coconut milk
  • 1/4 cup maple syrup

Topping…

  • 1 cup strawberry or raspberry jam (organic if possible)

Directions…

  1. Combine crust ingredients (dates, almonds, coconut) in a high-speed blender until incorporated.
  2. Line 1 standard cupcake pan with plastic wrap and press the mixture tightly into bottom of each cup.
  3. Blend filling ingredients (cashews, nut butter, coconut milk and maple syrup) in blender until very smooth.
  4. Pour filling mixture into cups, equally coating each mini crust.
  5. Place tray in freezer for 1 hour to allow filling to set.
  6. Remove cups from pan and allow to thaw for 30 minutes.
  7. Top each tart with dollop of jam. Serve immediately.

Makes 12 cupcake-sized tarts.

Raw Key Lime Pie

By contributor Alexandra Courts 

This key lime pie recipe of mine is raw, gluten-free and vegan! And since it’s no bake, it’s a snap to make! What’s not to like?

IMG_7533 2 IMG_7521

Ingredients:

Crust…

  • 2 1/2 cups pitted dates
  • 1/2 cup shredded unsweetened coconut
  • 1 cup raw almonds

Filling…

  • 2 1/2 cups cashews, soaked overnight and drained
  • 3/4 cup full-fat coconut milk
  • 1/2 cup lime juice (from 4-5 limes)
  • 1/4 cup agave syrup

Directions:

  1. In a high-speed blender, blend the raw almonds. Add the remaining crust ingredients and blend until combined.
  2. Line an 8 inch round cake pan with plastic wrap. Press the mixture into the pan to form the crust.
  3. Blend all of the filling ingredients together in a high-speed blender until smooth.
  4. Pour filling into crust. Level the mixture with a spatula and place pie in freezer for about an hour or until it has set.
  5. Let the pie thaw before slicing. Serve and enjoy! Keep leftovers in fridge.

Makes 1 pie (about 6 servings)

Alexandra’s Favourite Summer Smoothie Recipes

By contributor Alexandra Courts

Smoothies are a healthy and refreshing way to start your day. The right combination of fruits (and sometimes vegetables) will give your body the fuel it needs to push through that dreadfully long morning.

Here are some of my favourite smoothie combinations! Just pop all ingredients into a high speed blender and blend away until a desired consistency is reached.

STRAWBERRY WATERMELON LEMONADE SMOOTHIE

Processed with VSCOcam with f2 preset

Ingredients…

  • 4 lemons, juiced
  • 8 cups watermelon chunks
  • 1 1/2 cups frozen strawberries

MIXED BERRY SMOOTHIE

IMG_3096

Ingredients…

  • 2-3 frozen bananas
  • 1 cup frozen mixed berries (raspberries, blackberries, blueberries and blackberries)
  • 1 cup orange juice
  • 1/2 cup frozen dark cherries

ORANGE MANGO SMOOTHIE

IMG_3243

Ingredients…

  • 3-4 frozen bananas
  • 1 cup frozen mango chunks
  • 1 cup fresh orange segments
  • 1 cup frozen pineapple chunks
  • 1 cup orange juice

CHOCOLATE BANANA SMOOTHIE

IMG_3732

Ingredients…

  • 4-5 frozen bananas
  • 1 cup frozen strawberries
  • 1 cup cold water
  • 2 tbsp raw cacao powder

TROPICAL GREEN SMOOTHIE

IMG_6140

Ingredients…

  • 3-4 frozen bananas
  • 2 cups fresh spinach
  • 1 cup frozen pineapple chunks
  • 1 cup frozen mango chunks
  • 1 cup orange juice

GF Vegan S’mores Breakfast Pastries

By Alexandra Courts

Trips to the grocery store make me miss some of the token junk foods that you just can’t find gluten-free vegan versions of, no matter how hard you try. Twizzlers? Dunkaroos?! DORITOS?! Pop-Tarts top that list. They made early mornings so much easier.

Well, whatever. If you can’t beat ’em, make your own.

Processed with VSCOcam with s1 preset

Processed with VSCOcam with s1 preset

S’MORES BREAKFAST PASTRIES

(Note: This recipe has been adapted from www.momables.com)

Dough Ingredients…

  • 1 1/2 cups gluten-free flour
  • 1/2 cup Earth Balance vegan “butter”
  • 6 tbsp cold water
  • 3 tbsp coconut sugar
  • 3 tbsp unsweetened applesauce
  • 1/2 tsp salt
  • 1/2 tsp flax meal
  • 1 tsp vanilla extract

Filling Ingredients…

  • 1/2 bag Enjoy Life mini chocolate chips
  • 1 cup gluten-free vegan marshmallows (I used Sweet and Sara brand)
  • 1/2 cup Artisana raw chocolate coconut butter

Directions:

  1. In a large bowl, whisk all dry dough ingredients together. Add vanilla extract, vegan “butter”, applesauce and water. Combine. Use hands to work dough and ensure all ingredients are thoroughly incorporated.
  2. Roll dough into large ball. Add more water if necessary. Place dough ball in fridge to chill for 1 hour.
  3. Preheat oven to 350F. Line baking sheet with parchment paper and set aside.
  4. Roll out chilled dough into thin layer. Cut into rectangles with large knife. Rework and repeat for rest of dough.
  5. Place half the cut rectangles on parchment paper for bottom layer of pastries.
  6. Combine filling ingredients in bowl, then add dollop to centre of each rectangle.
  7. Wet a finger in cold water, then run finger along edges of pastries. Top each pastry with remaining rectangles.
  8. Press seams together with fork. Poke small hole in top to allow for steam to escape.
  9. Bake for 25-30 minutes until edges are slightly golden.
  10. Let cool and enjoy!

Makes 12 servings.

Easter Weekend Dessert Series: Baked Cinnamon Sugar Doughnuts

By Contributor: Alexandra Courts

The first in our Easter food series! Why spend time decorating eggs when you can bake treats instead?

Buy a doughnut pan. Seriously. It will change your life…or at least the way you think about homemade doughnuts. Ditch the deep fryer and opt for a light and cakey version that is both vegan and gluten-free!

IMG_1879

IMG_1881

This plain doughnut recipe that I’ve adapted from bonappetit.com is so simple, yummy, and healthy that you will ditch that love affair you might have had with your local bakery.

The recipe is as follows for these little cinnamon sugar babies:

Ingredients…

Doughnut Batter

  • 1 cup organic coconut sugar
  • 3/4 cup + 2/3 cup brown rice flour
  • 1/2 cup potato starch
  • 1/2 cup hot water
  • 1/3 cup melted coconut oil (Melt a little extra to coat the trays with to prevent sticking)
  • 1/4 cup arrowroot
  • 1/4 cup vanilla extract
  • 6 tbsp unsweetened applesauce
  • 1 1/2 tsp baking powder
  • 1/2 tsp ground flaxseed
  • 1/2 tsp salt
  • 1/8 tsp baking soda

Cinnamon Sugar Coating

  • 1/2 cup organic coconut sugar
  • 1 tbsp cinnamon

Directions…

1) Preheat oven to 325 degrees. Brush doughnut tray with coconut oil and set aside.

2) To make a “flax egg” (egg replacement) mix 1 part ground flax (1/2 tsp) with three parts (1 1/2 tsp) hot water. Let sit for 5-10 minutes.

3) In a large bowl, whisk together all dry ingredients. Once combined, add flax egg, melted coconut oil, unsweetened applesauce, vanilla extract and remaining hot water.

4) Spoon about 2 1/2 to 3 tablespoons of batter into each doughnut mold.

5) Bake for 8 minutes, flip, then continue baking for 5-7 minutes or until golden brown. Let the doughnuts sit for 10 minutes before removing from tray.

6) Whisk together coconut sugar and cinnamon in a small bowl. Dip each doughnut lightly into the sugary coating before serving.

Yields 12-15 doughnuts. Enjoy!

Raw Energy Balls

Post by Alex Courts

It’s the middle of the day. Too late for lunch and too early for dinner.

You’re hungry and you’re faced with the decision of what you should have without spoiling your dinner.

Chips? Cookies? Candy? No!

Opt for something natural, nutritious, and filling! These little babies are vegan, gluten-free, and raw!

Good news is that these are quick to make and can be stored and enjoyed later on!

IMG_1175

Yield: approx. 2 dozen snack balls

Ingredients:

  • 3/4 cup unsweetened coconut
  • 3/4 cup dried cherries
  • 1 cup dried mango
  • 1/2 raisins
  • 1 cup sliced raw almonds

Directions:

  1. Run the first four ingredients through a food processor for a full minute (or until well-combined).
  2. Add the almonds and process for another full minute.
  3. Place mixture in bowl and start forming (squeeze and roll) and form 1 tablespoon into a ball.
  4. Repeat process until all the mixture is used.
  5. Suggested: Roll the balls into any remaining shredded coconut.

Store any uneaten balls in the freezer for up to a month.

Easy Vegan Holiday Season: Day 7

By Alexandra Courts

Twenty centimeters of snow has fallen. To me, that just means that I get to stay inside and cook up something comforting and hearty. Growing up, Christmas dinner with my family was not complete without some sort of roast or meatloaf in the centre of the table. Now, seeing how that is no longer an option for me, I was desperately searching for something that would replace and become the main portion of my holiday meal. Lentils were my go-to. They are both filling and delicious!

Here I transformed lentils into a loaf that is perfect for the holidays.

Keep warm, stay full, and be joyful!photo 5Adapted from ohsheglows.com

Glazed Lentil Walnut Apple Loaf

Yield: 1-2 large loaves, or a number of mini loaves

Ingredients:

Loaf…

  • 1 cup uncooked green lentils
  • 1 cup walnuts, finely chopped and toasted
  • 3 tbsp ground flax + 1/2 cup water
  • 3 garlic cloves, minced
  • 1.5 cups diced sweet onion
  • 1 cup diced celery
  • 1 cup grated carrot
  • 1/3 cup peeled and grated sweet firm apple
  • 1/3 cup raisins
  • 1/2 cup gluten-free flour (Robin Hood Gluten-Free Flour/flour of choice)
  • 3/4 cup breadcrumbs (gluten-free option: grind plain gluten-free cereal/bread)
  • 3/4 tsp dried thyme
  • salt & pepper, to taste
  • red pepper flakes, to taste

Glaze…

  • 1/2 cup ketchup
  • 1/2 cup pure maple syrup

Directions:

1. Preheat oven to 325F. Rinse and strain lentils. Bring 3 cups of water to a boil and season with salt. Place lentils into boiling water and stir. Reduce heat to medium/low and simmer, uncovered, for at least 40-45 minutes. Stir frequently & add touch of water if needed. You want to overcook the lentils slightly. Mash lentils slightly with a spoon when ready.

2. Toast walnuts at 325F for about 8-10 minutes. Set aside. Increase oven temp to 350F.

3. Whisk ground flax with water in a small bowl and set aside.

4. Heat a teaspoon of olive oil in a skillet over medium heat. Sautee the garlic and onion for about 5 minutes. Now add in the diced celery, shredded carrot and apple, and raisins. Sautee for about 5 minutes more. Remove from heat.

5. In a large mixing bowl, mix all ingredients together. Season with  salt and pepper to taste.

6. Grease a loaf pan and line with parchment paper. Press mixture firmly into pan. Whisk glaze ingredients and then spread half on top of loaf. The remaining mixture can be used as dipping sauce.

7. Bake at 350F for 40-50 minutes, uncovered. Edges will be lightly brown. Cool in pan for at least 10 minutes. Transfer to a cooling rack. The loaf is ready for slicing! Enjoy!

Easy Vegan Holiday Season: Day 5

By Megan Stulberg

As a Celiac, I haven’t had stuffing with Christmas dinner in far too long…and it was always my favourite part! So this year I decided to finally bite the bullet and try making my own. It was much easier to make than I had expected. Here’s my recipe for a delicious gluten-free vegan stuffing that skips all of that heavy cream/chicken broth malarkey.

997021_10153587546495133_1502385675_n1479299_10153587546290133_781043817_n

Gluten-Free Vegan Stuffing

  • 1 loaf whole grain gluten-free bread
  • 1/2 cup chopped celery
  • 2/3 cup white mushrooms, finely diced
  • 2/3 cup organic seaweed, crumbled
  • 1/2 cup fresh lemon juice
  • 3 tbsp gluten-free soy sauce
  • 2 tbsp olive oil
  • 3 cloves of garlic, finely diced
  • 1/4 cup parsley, chopped
  • 1/4 cup basil leaves, crushed
  • 1 cup gluten-free vegetable broth
  • 2 tsp salt
  • 2 tsp black pepper

Directions:

1) Prep: If you’re using a frozen gluten-free loaf of bread, remove from freezer and let thaw for 1 hour at room temperature before use. Preheat oven to 350 degrees. Use a cooking spray or vegan butter to lightly grease a shallow baking dish.

2) Cut 8-10 bread slices into small cubes. Set aside in a large bowl.

3)  Add 1 tbsp of olive oil to a medium skillet over high heat. Turn down to medium heat once the oil sizzles. Sauté garlic for 1 minute, then add celery and cook for an additional 2 minutes. Add the mushrooms and stir consistently until the mushrooms darken.

4) Add the vegetable broth, soy sauce and lemon juice. Let everything cook for a few minutes, stirring occasionally.

5) Remove mixture from heat and pour overtop of the bread cubes. Add the seaweed, salt, pepper, oil, parsley and basil. Toss all ingredients together until the bread is thoroughly soaked. If desired, add a splash of water.

6) Transfer mixture to the shallow baking dish and place in oven. Cook covered for 20 minutes, then uncovered for an additional 10-15 minutes if you prefer stuffing to be more brown.

7) Remove from oven and let dish cool for 30 minutes. Try serving with tofurky, cranberry sauce and roasted veggies.

Makes 6 side servings.

Easy Vegan Holiday Season: Day 4

Post by Aine Davis

Who doesn’t love gravy? Gravy is something that can be enjoyed all year long, but it’s especially good at Christmas!

I’m Canadian, so (vegan) poutine is an essential staple in my diet. And let me tell you, it’s hard to find vegan gravy!

Gravy goes great with pretty much anything too! Try serving it as a side dish with a fancy dinner with nice drinks.

romantic

Shiitake Mushroom Gravy

Adapted from Know thy Food.

  • 2.5 cups vegetable broth
  • 3 tbsp chickpea flour
  • 1 tbsp soy sauce
  • 1 tsp thyme
  • 1 tsp sage
  • 2 tsp olive oil
  • 1/2 red onion, finely diced
  • 3 cloves garlic, minced
  • 2 cups shiitake mushrooms, sliced
  • 3 tbsp nutritional yeast
  • 1 tsp cayenne pepper

1. Whisk the broth, soy sauce, thyme, sage and flour together. Set aside.

2. Heat the olive oil in a large, shallow saucepan for about one minute until sizzling. Add the onion and sauté until it becomes translucent.

3. Add the garlic and mushrooms and continue sautéing for 4-5 minutes or until mushrooms have browned.

4. Add the broth combo to the saucepan. Let it sit for 2-3 minutes, then add the nutritional yeast. Mix thoroughly.

5. Reduce the temperature setting and let it cook for about 20 minutes or until desired thickness. 

6. Remove from heat and serve! Once the gravy has cooled, feel free to freeze extra for later.

Serves 2.